Friday, September 7, 2018

September 2018 Card Class

Wow, this summer has been SO busy! I can't even try to catch up, so I'll just move on from today. Next Saturday, September 15th, from 1:00 to 4:00 will be our next card class at the Rawlings Library in Pueblo, Room Brett Kelly B and these are the cards we'll be making.
   

Denise and I have been discussing whether or not to continue posting pictures of the cards we'll be making at upcoming classes. What do you think? Any input is welcome!

Until later,

Tuesday, July 24, 2018

Back Yard


A couple weeks ago, we finally had a chance to work on the back yard a little. There's still a LONG way to go, but every little bit helps. It was so hot - I really felt sorry for people who work outside all year long.

We added three more rock steps, terraced the hill, and planted a real, non-native tree that we purchased at Perennial Favorites, an awesome nursery between Colorado City and Rye. It's an Idaho poplar...or maybe a Utah poplar...well, it's SOME kind of poplar tree!

Next we need to plant a purple smoke bush that we purchased at the same time. It's still living on the deck, though, because we can't figure out where to put it.

The garden is doing fairly well, but slow because of how hot and dry it's been. This year I'm experimenting with peas. Last year I tried yellow squash, but that stuff has stickery things all over it! I decided I don't need to grow something that hurts me when I try to harvest it.

Not a terribly exciting blog post, but I'm really trying to get something on here at least once a week. So, until next week....

Sunday, July 22, 2018

Saturday Class

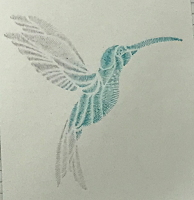
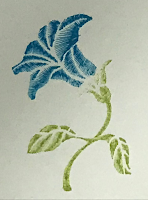
Today I'm putting together kits for next Saturday's card class. These are the cards we'll be doing, using new stamps, inks, and other products from the new 2018-2019 FSJ collections:


Should be fun, and although we haven't heard back from anyone yet, we usually have around 8 ladies attend.

Other than preparing for class, I've just been kind of puttering around. I'd like to start some sewing projects, but need to clean up and organize in my craft cave before I allow myself to do that. I've also set myself a goal to blog at least once every week, but I'm finding it hard to get back into the swing of things.  I just looked back at some of my photos - maybe I'll pick one or two every week and use that for inspiration.

Monday, July 16, 2018

Planners and Bullet Journals

So....is anyone out there into the planner / bullet journal craze? I attended a meeting of the Pueblo Planner Peeps today, and was amazed! What a creative group of ladies! They have multiple planners, special pens and stickers, and all kinds of decorative accents.

My idea of planning is noting appointments and plans on my phone calendar, adding groceries to my phone list app, or writing a "to-do" list on my phone notes app. I mean, I always have me phone with me, and the apps sync with my husband's apps, so we always see the same info.  I'm really not sure how or where to start, but I'll stick my toe in the water, just to see what this addiction is all about.

I happen to already have two planners from FSJ - an orange personal size one that I use for stamping and FSJ product-related information, creative notes and orders. Then at Convention we were all given an A5 planner that I haven't started to use yet.  I'm not ready to dive into those just yet, but they're here when I need them!


My first goal is to learn about bullet journaling. I've dug out a small spiral notebook with a hard cover, some pens and a ruler and put them all in a handy little box. On the first page of the notebook, I wrote the KEY:

Apparently my next step to is create a MONTHLY - basically just a calendar. One of the ladies I met showed me her journal. The pages were blank except for faint, evenly spaced dots. Those dots helped her draw the lines for her calendar.

Well, we'll see if I do this or not!!


Thursday, July 12, 2018

How Does My Garden Grow?

It's been SO dry and hot this summer that it seems everything is slow. We water every morning, but so far it seems that's just enough to keep things alive! Not even the ONE zucchini plant that lived is growing much. But finally the parsley and basil are about ready to use, the peppers are about ready to start blooming, and we actually have four or five small green tomatoes and one that's starting to turn a bit pink. The strawberries don't seem to be doing much - no booms, berries, or runners, but maybe they'll pick up a bit this fall. The asparagus are doing well. We don't harvest yet, just let it go to fern and seed to let it get more established. And the peony is doing great - I might actually get a flower next year!
Basil, lavender, parsley, cilantro, chives
Tomatoes - 4 different kinds this year

Asparagus and peony


On the other hand, the Russian Sage is spreading like wildfire. I really need to get it under control. I trimmed up the catmint, tarragon, and rosemary today, so they'll look a little better.

We just purchased a purple smoke bush/tree, and I've been trying to decide where to put it and researching when/how to prune it to keep it as a bush. This resource seems pretty good. Now I just have to remember to check it early next spring! http://homeguides.sfgate.com/prune-smoke-bush-42068.html

We also bought a Utah Poplar tree. We really miss the two aspens that died, so are hoping this will help fill that space.

Wednesday, July 11, 2018

Bits 'n' Pieces

Boy, I sure haven't done anything here on the blog lately. Summer always seems to be so busy that I don't want to be on the computer much. I'm still crafting now and then, but my garden seems to get more of my attention.

Since I last posted, I attended the FSJ Convention in Phoenix, AZ with downlines Denise and Sue and upline Nanette. This was my third one, and the best so far, I think. It's so much fun! Our new catalog is really amazing too. I love it! Check out the online version by clicking the link at the right.
(P.S. If you'd like to go with me next year, contact me about joining FSJ. You can join for as little as $50 and the minimum required purchase/sales are $150 per quarter. Coaches get 20% off everything, too. It's really a great company to work with - a very helpful, friendly, family-type organization.)

Denise and I had a very enjoyable July class the week after we returned. These are the cards we made:

Colored with Color Splash Pencils
Create-a-Palette Inkpads
Pan Pastels on Clear Embossing Ink
Die-cut Cross with Washi Tape
I haven't been using my Scan n Cut a lot lately, but I did use it to cut out the whale for the "Get Whale Soon" card that Denise designed. (I don't have time in class to completely make the card kits she brings, so I do the stamping and preparation, then put them together when I get home.) I also stamped some sentiments, drew a pencil line around them, and used the SnC to cut just inside the line. I should take some pictures of that process some day!

I guess I've rambled long enough, so I'll say bye for now.


Friday, April 13, 2018

Letter Shadow Boxes

I've been a long time absent - but all for a good reason. :-)  I recently returned from a 6-week vacation. The first 3 weeks I got to baby-sit my 5-year-old and 2-month-old granddaughters, and the next 3 weeks I spent camping, hiking and soaking up sun with my husband near Tucson, Arizona. It's good to be home, but I've realized how much I need to do to catch up on things!!

 Of course I HAVE to share a picture of my beautiful girls before focusing on anything else!

I wanted to take something along for each of them, but Addi has too many toys and Jemma has no need of them yet, so I decided to create something for their rooms. Here's the result, cut with my Silhouette Cameo from patterns purchased from 3Dcuts.com. We hung them both up at a little "Welcome Baby Jemma" brunch my daughter held. She also helped me de-stash a bunch of extra cards I had by giving them as door prizes to the guests that brought diapers!


Friday, February 9, 2018

Experimenting with my Scan n Cut

One of my FSJ Coach friends posted on Facebook that she was having some trouble cutting this cute little stamp - Age is Irrelephant (AT-0212) - with her Scan n Cut. Instead of just cutting around the elephant, it was also cutting out the ear and the eye. So I decided to try experimenting a little with the settings.

I used my 2017 birthday stamp, because it has LOTS of open areas that might lend themselves to a bad cut. My first scan was terrible - so I tried again and had better results. I have no idea what the difference was! But I discovered that I was able to get just an outline when scanning in black and white (the center setting) OR in color mode if I stayed at 5 or more colors. Taking the colors down to 2 gave me the ability to scan the inside lines as well. Here are my results, if anyone's interested!!

Direct Cut, set to B&W using the wrench and screwdriver button
Looks OK - B&W setting right in the middle
Yep - it's cutting just the outside edge. I could add an offset if I wanted more white area around the image.
 

Next I changed to color mode, again using Direct Cut and the little Tools button.
Seems like it might be working with the 5-color setting.
When enlarged, I can see it will cut just the outline. Great!
  
Just for fun, I tried decreasing to the 2-color option.
Well....somehow I don't think this would be the best cut!!
I'm not sure how this will relate to our cute little elephant, but hopefully it will help me remember to try different scan settings to find the best scan for the results I want at least.


Tuesday, January 30, 2018

Pencil-outline Cutting with Scan n Cut

Some images and especially sentiments can be challenging for the SnC. This particular stamp set has a lot of feathery little areas and broken lines. Here's one way to cut images like this.


1. Draw around the image with a pencil:
 
2. Scan to Direct Cut, using the Black/White setting. Frame the scanned image with the arrows.
 
3. Click on the double circle tool (offset??). Adjust the border to a negative number. I used -0.02 and -0.03. By using a negative border, the image should cut INSIDE the pencil line so you don't have to erase it.
 
4. Cut the image - erase any stray pencil lines that are left. Here are the results from the three images I tried. With a -0.03 border, the pencil line is removed when the image is cut.
 

Other methods involve tracing the outline on an acetate sheet, but this pencil-outline method is quick and easy.