Friday, April 21, 2017

April Technique Blog Hop

APRIL: Stamp Set Showdown

Welcome to A Year of Card Techniques Blog Hop where each month we’ll feature a different card technique. We’ve assembled a team of fabulous card makers who range from new to advanced, so you’ll see a wide variety of cards and ideas.

The month of April features a Showdown! A stamp set showdown, that is. We’re using one stamp set in various ways. Let’s face it, stamp sets are getting more and more expensive; so we’re here to inspire you by demonstrating how to s-t-r-e-t-c-h those stamps! 

If you would like to check out our past technique hops, you can do that here:
January-Shaving Cream Marbleizing
February-So Sketchy
March-no hop 

Also - I'm the sponsor this month! Here's the prize - three Artist Trading size stamp sets from Fun Stampers Journey (plus a little surprise!) Please take a moment to check out our great products here. Also, you might want to visit my Facebook Group here to see some of the cards my group makes at our monthly classes. 

We really appreciate feedback, so please leave a comment on each of the blogs in the hop today. One winner will be chosen from all comments on the hop as of April 28, 2017. The winner will be announced in our May hop; so be sure to come back next month. 

You should have arrived here from Kim's blog, Katydid Cards.  If you're visiting here first, you might want to start at the beginning so you don't miss a thing and increase your chances of winning by leaving a comment on each blog. 

Now - on to the good stuff! I've chosen the Glass Blooms set by Fun Stampers Journey to focus on this month:


This set originally debuted in the February 2016 Bloom Box, Fun Stampers Journey's monthly kit, and was one of the items that led me to sign up as a Coach....but I was just 5 days too late to get it! Three months later it became available to non-Bloom Box subscribers, and I immediately purchased the set and matching dies. Four designs (which I've since duplicated) came in the original box, and I've created or CASE'd many others. This is one set that I hope doesn't retire for a LONG time to come! I hope you enjoy some of these cards, all mainly focusing on the dragonfly image. Because I LIKE dragonflies.


For the first card, I spritzed some water on my card stock and then dropped in some of our FSJ Silks. The colors moved and spread beautifully. After the card stock dried, I stamped and die cut the images to use in the card below.


I added more Silks to the embossed back panel, popped up the images, and added a few sequins because it looked like it needed something.
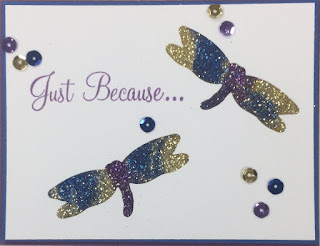


Lately, I've been coloring FSJ's clear glitter (Sparkle Dust) with Silks to create fine colored glitter to match my papers and inks. On this card I die cut the dragonflies from the white panel and added clear packaging tape to the back of the openings, sticky side facing front. Then I sprinkled the colored glitter all over the tape and burnished it with my finger.


Here, I masked off both sides of the card, and sponged on pan pastels in the center for the background. Then more Silk splatters! The dragonflies are painted with Silks diluted with a bit of water.


This card was one of the designs included in the original Bloom Box. The background was created by dipping the cap from the ink refill bottle into a puddle of ink, then "stamping" random circles. Journey Glaze makes the wings shiny.


For this card, I simply stamped my images onto a panel of Whip Cream card stock, and then cut it into thirds and adhered it to the card base. All of the flowers have blue centers, honest! I'm not sure what happened on the bottom right when I took this picture...

Now you’re off to visit with Jearise.  Hope you had fun and thanks for stopping by. See you next month with another technique!

Here’s the full line-up in case you get lost:
Sharon - A Piece of Heart
Claudia - Crafting with a View
Kim - Katydid Cards
Wilma - Stampin' to the Oldies (You are HERE!)
Jearise - Lorby's World
Amanda - My Thoughts & Scraps
Lisa - Lisa's Little Bits
Jodie - Stampin Jodie Creations
Card A Day Challenge Team - Card a Day Challenge
Ronda - Ronda's Paper Creations
Sandy - Scrapbook Blessings Club
Candy - candy scraps

Sunday, April 16, 2017

N is for...Not doing this anymore!

Well, I got about halfway through the April A-Z Blogging Challenge. Interesting, and helpful in a way, as I did post more than usual, but I've decided there's really no point (for me, that is) in trying to artificially come up with "something" every day. This blog is mainly for my own enjoyment, and a place to keep track of miscellaneous stuff that I might want to look back at later. And I'm finding that trying to post every day this month is defeating the purpose. I'm not enjoying it!

So, I'm not doing the challenge anymore.  I might post tomorrow...I might not... 👋

Friday, April 14, 2017

M is for...My Mom

Me and Mom with my younger brother Les

My mom is amazing. She's 87 years old and still living on her own, about a 45-minute drive from me. At some point she may decide it's time to come live with me and my husband, but we want her to make that decision. She has a beautiful yard with lots of flowers, and we've FINALLY convinced her to get some help with the heavy work. I also just recently convinced her to try the motorized carts at the grocery store - it was a real hoot helping her learn to drive one the first time

Mom and I (and Dad!) went to college together. Mom went to normal training after high school, then taught, but had to quit when I and my brother were born. She wanted to teach, and she made it happen. She taught 3rd grade for many years, and it was wonderful being able to talk to her and ask for advice in my own teaching. A few years ago she told me she wanted to join the Peace Corps, but married young and never had the chance.

She was a fierce advocate for my special needs brother, always looking into educational opportunities for him. Even though he's in 24-7 care and she has transferred his guardianship to me and my younger brother, she remains actively involved in his welfare.

Unfortunately, lately she's been feeling weak and short of breath, and having problems with her feet and legs swelling. The last time we went to get her groceries, she chose to sit and wait while I did the shopping. I feel so lucky to still have her, and I worry about her. I guess that's part of life, but she's always been so strong and smart. She is my role model and I love her very much.

Mom and her younger sister Viola
First time in motorized cart
 

Thursday, April 13, 2017

L is for...Leftovers

I wish I could empty my refrigerator. I'm sure the dishes of leftovers multiply every night. Hubby started a diet Monday, but we still had two containers of enchiladas, a big bowl of white chicken chili, a refrigerator dish of pork and veggies from our kabobs, some pinto beans, several cauliflower/egg cups and some miscellaneous UFOs: unidentified fridge objects.

Don't get me wrong - I like leftovers. My husband likes leftovers, too. But they collect so quickly, even when we actually plan to use them for the next meal, and they're not on the diet. Right now we could eat for three or four days on what's in the refrigerator.  So why the heck do we keep cooking MORE? Since he retired, Hubby discovered he likes to cook, and he cooks. I'm not complaining about not having to be in the kitchen except to clean up. I'm not complaining about someone feeding me regularly! I guess we just need to make everything in two-serving sizes, which doesn't seem to be happening!

Every now and then I make leftover soup. EVERYTHING in the fridge goes in the soup. Sometimes it comes out really good. And...sometimes it doesn't. :-) Anybody have a good solution to the leftover problem? 

Wednesday, April 12, 2017

K is for...Kabobs

I posted last week about my friend Connie and her Halibut Tacos. Well, on the same trip, she introduced us to kabobs. She marinated chunks of beef steak, mushrooms, shrimp, bell pepper, zucchini, onion and shrimp for a couple of hours, then strung them on sticks and grilled them.  Yum! We have tried grilled stuff on sticks before and not been too impressed, but this marinade makes all the difference. My husband loves the marinade just the way it is!

We have a couple of cable kabobs that worked pretty well for the veggies. We put the meat on straight metal ones we had in the drawer. No soaking!

We decided on pork instead of beef, and it turned out very tender and flavorful. I suspect we'll be making this a lot this summer.

Oops! Almost forgot to post the recipe!

Kabob Marinade

1 cup peanut oil (this seemed a bit too much - we'll try ¾ cup next time)
1/2 cup soy sauce
3 Tbl honey
3 Tbl cidar vinegar
2 Tbl toasted sesame seeds
2 cloves garlic, minced
1 tsp grated fresh ginger
3 lb beef cubes
45 medium shrimp
16 skewers

Marinate 15 minutes and grill.

Tuesday, April 11, 2017

J is for...Jennifer's Card Class

This might be stretching the "J" a bit - but I did attend a card/stamping class put on by Jennifer Sharp last weekend, and we made three delicious cards that I really want to share. Jennifer is a Stampin' Up demonstrator here in Pueblo. She attends my classes and I attend hers, and we order from each other now and then. Her cards are always beautiful and elegant and I love going to a class where I can sit and create with friends without having to run back and forth between the groups. She has a Facebook page called Stampalotagus where she also posts extra designs for the stamp sets we've used in her monthly class.


Another thing about Jennifer's cards - they're always lovely on the INSIDE, too! My photography isn't great and doesn't do them justice. Trust me, they're great!

Monday, April 10, 2017

I is for...Iris

My 87-year-old mom grows irises. LOTS of irises. (Or is the plural just iris? Oh well...) Iris beds expand. Exponentially! Every year she goes out, digs up her irises, divides them, and makes new beds. She's been running out of room in her yard for years, but every year she still divides them, trims the tops neatly, puts them neatly in cardboard boxes and gives them to everyone she can.

I've been the recipient of quite a few of those extras. When we were first building the house, she asked Hubby to haul away a bunch in the back of the pickup. We gave most to neighbors, then he went out to the lot and just dumped the rest in a pile next to an old shed on the property. Next spring they grew, and they've been growing ever since. When I took this picture I realized I need to get outside and clean up the beds - they're VERY untidy!


After we finished the house and moved in, I planted a few on purpose. They took over every bed I put them in, and I've become my mother, digging them up, dividing them, building new beds, giving them to all the neighbors, and wondering what to do with the rest. They even tried to take over from the yucca, but it's fighting back! They're weeds, I'm sure of it!!! But they're pretty weeds and they take absolutely no care. I just wish the blooms lasted longer.

This year we're terracing this flower bed. Hubby said some of the plants might be destroyed in the process. I looked at the sweet little irises peeking out. Then I laughed and said, "Go ahead - I know where I can get more!"

Sunday, April 9, 2017

H is for...Halibut Tacos

We recently returned from an RV camping vacation in southern Arizona. We met up with long-time friends Connie and Bill and stayed at Kartchner Caverns and Patagonia Lake. Connie had brought along some Alaskan halibut, and one night she treated us to halibut tacos. Her daughter, Shawna, had made them for her last summer.

I had heard of fish tacos before, but never really wanted to try them. After all, I'm a southwestern girl, and we don't make tacos out of fish. Hamburger, pork, chicken...sure. But NOT fish! It just didn't sound good at all, but I figured they wouldn't kill me so I'd give them a try.

Oh my gosh! They were delicious! I don't know if this is the way everyone makes fish tacos, but I don't really care. We've found a great new way to use some of the halibut we have in the freezer, and I'm looking forward to making some for friends here at home. This recipe is simple - my favorite kind (maybe because we used packaged taco seasoning instead of mixing our own seasonings!). Don't skip the crema!

Shawna's Halibut Tacos

Crema:
¼ c. thinly sliced green onions
¼ c. chopped fresh cilantro
3 T. mayonnaise
3 T. sour cream (or yogurt)
1 tsp. grated lime rind
1-½ tsp. fresh lime juice
¼ tsp. salt
1 garlic clove, minced

Tacos:
1 tsp. ground cumin
1 tsp. ground coriander
½ tsp. smoked paprika
¼ tsp. ground red pepper
⅛ tsp. salt
⅛ tsp. garlic powder
1-½ pounds halibut filets, cut into 1" cubes
8 (6-inch) corn tortillas
1" cooking oil, heated in small skillet
2 c. shredded cabbage

Blend all ingredients for crema together and refrigerate until ready to use. Mix seasonings together. Spray skillet with cooking spray and cook halibut, stirring to break cubes apart. Add seasoning when halibut is about halfway cooked and continue stirring. Set aside. Pass tortillas, one at a time, through hot oil to soften. Lay on plate, fill with halibut, and garnish with shredded cabbage and prepared crema. Fold and enjoy.

Friday, April 7, 2017

G is for...Granddaughter

I have a precious granddaughter. She's 4-½ years old. I wish she lived closer to me, but she's going to come visit for a week this summer with her beloved Auntie, while her mom and dad take a little vacation, for the first time since she was 6 months old.  We're really looking forward to seeing her!

She likes Grandma's craft stuff, so we'll have lots of fun glueing things and coloring things! And of course we'll go out and pick vegetables out of the garden and pull weeds in the flower beds and collect pretty rocks and read books. She'll get to help Uppa drive the 4-wheeler and the Bobcat and help him build things in his shop. We're going to go camping and she'll get to go fishing with her My Little Pony fishing pole that Uppa has already bought for her. And we'll see the rabbits and the birds, and we might see the deer and the turkeys. (Hopefully we won't see any rattlesnakes!)

It's pretty cool being a Grandma!!!

F is for...FUN Stampers Journey

I really enjoy being a Fun Stampers Journey Coach. I like the products and have really loved getting to "know" other coaches across the country via FaceBook and other social media. I started a little over a year ago as a hobbyist, but surprised myself with two promotions and suddenly I'm a Senior Coach Leader without really trying. So that's a good thing, and I reckon I'm being successful at it.

But not long ago I was reflecting on WHY I make cards. I mean, really - why do I spend time and money to make greeting cards when I certainly could go down to the Dollar Tree and buy a bunch???? I have boxes of cards I've made, and every month I make more to demonstrate at my class or just because I see a card that's pretty or a technique that I'd like to try. I need to figure out what to do with all the extras, and every now and then I think, with sympathy, about all the "stuff" my daughters will have to deal with when I die! (Of course, my husband has a lot more "stuff" than I do, and it's a lot BIGGER! Lol!)

Anyway, as I thought about it, I realized that I do it because it's FUN. I enjoy the creative process. It's a quiet time when I can go down in my craft room and listen to a book on tape while I play with my "stuff." My monthly classes are a social time when I get together with a bunch of ladies that I really like. I can't see well enough to bead any more, so ink, sequins and card stock help fulfill my need to fondle colorful, shiny, pretty things!

So I guess it's not really about the cards. Yes, people compliment me on the Christmas and birthday cards I send them, which makes me feel good. And find I'm sending a lot more cards and keeping in touch better than I used to. My mom takes a lot of my spare cards and uses them, so she doesn't have to go out looking for a card when she wants to write a note to a friend. But it's really about having something to do that I enjoy. Some people run, hike or walk. Others play sports or build things. Me? I stamp. 😀 And it's FUN!!!

On a side note - here are the cards we'll be making at my April class on the 22nd.


Wednesday, April 5, 2017

E is for...Egg Muffins and Enchiladas

When we got up yesterday we had snow. LOTS of snow. And it kept snowing all day, so it was a perfect day to bake and cook. We picked up a couple dozen raw corn tortillas in Arizona, so I dug out the griddle and baked them all - then I had to do something with them. I absolutely love cheese enchiladas, so chopped an onion, opened a can of enchilada sauce and a can of tomato soup, and pulled out the giant bags of Sam's Club grated cheese. I was going to add a chunk of cream cheese too, but when I opened the wrapper I saw the biggest glob of mold I've ever seen! I jumped, screamed, and threw it in the trash really fast so it couldn't spread! (No, I didn't take a picture - posterity doesn't need that!) The enchiladas came together just fine without cream cheese, and it's always good to know all I have to do for dinner is stick a casserole dish in the oven, and viola! 

We recently had a cauliflower that needed to be used, and had seen ideas on Facebook for making everything from bread to pizza with that simple veggie, so decided to try egg breakfast "muffins." They were yummy! So yesterday the hubby made another batch. One head makes two dozen or so egg muffins and I don't care for as much heat as he does - so he split the batch.  Great idea, right? His had the green chiles and the cayenne, mine just had bacon and chopped veggies. So this morning I get out my egg muffin, warmed it up a bit and took a bite. ARGGHHH! He added PEPPER.  Lots and lots of pepper, apparently. He figured it wasn't chile so I wouldn't mind. I have 11 more of those to eat. 😐 But it really is a good recipe, and you can add anything you want to customize them. There are no exact measurements...just toss things in! I might try some cream cheese next time if it's not growing green hair.

Cauliflower Egg Muffins

1 head of cauliflower, finely shredded or chopped
5 large eggs (or enough to make the mixture kind of like a batter - not sloppy, but not dry)
about a cup of shredded Cheddar cheese - or whatever cheese you like
cooked bacon or ham
chopped onion
chopped bell pepper
chopped fresh spinach
etc. etc.

Mix everything together, and plop spoonsful into well-greased or sprayed muffin tin cups. Top with a little more shredded cheese if desired. Bake at 350° for about half an hour. These freeze just fine.

On a side note - all that heavy wet snow collapsed the roof on my screened garden beds. Rats. I told hubby when he built it that it didn't need the screen on top, so this year we'll try it that way. (We have a couple of big screened "rooms" around all our garden beds to keep the deer, mice and rabbits from having their way with our vegetables.)

Tuesday, April 4, 2017

D is for...Dinosaurs

I'm having a really hard time coming up with a post for D.  I thought I had it all figured out. Today I went down to my sewing room to finish up a wallet out of a dinosaur print. Perfect! A few glitches here and there, but I finally finished it, brought it upstairs to take a few pictures and write the post... and suddenly realized that all those cute little purple and green dinosaurs were actually ALLIGATORS! My husband rolled his eyes, shook his head, and said "Did you just figure that out??" Yes. I just noticed. I've never been the most observant person in the world....

But then I checked my email. My April Bloom Box is on its way, and it has cute little DINOSAURS. Phew! Something to post. :-) They're these adorable little T-Rex dinosaurs with short arms.

There's only one child in my world at present. Granddaughter Addi is 4-½ and lives WAY too far away as far as I'm concerned. But she's coming to visit this summer, so maybe we'll stamp and color some dinosaurs together.


Fun Stampers Journey has a couple other cute dinosaur sets. I had been playing with the idea of ordering at least one of them, but hadn't gotten around to it, so the Bloom Box will fill an empty niche in my stamp collection. But I might have to have the Dream Big ATS too!


Monday, April 3, 2017

C is for...Coffee and Cranberry Muffins

I drink coffee every day.  It becomes routine, and I don't always think much about it.  But today we're having our good friends John and Bonnie over to join us for our morning coffee.  Suddenly it becomes more than routine - it's special. My husband and John have gotten together for morning coffee every couple of weeks for quite awhile, and now that Bonnie and I have also finally retired, we enjoy joining them.

I'm baking my special Low Bush Cranberry Muffins, a recipe I've been making for years, since our girls were little in Nikolai and McGrath, Alaska. Luckily we still have good friends who live in Alaska and send us some every year. I hoard them like gold, and only bring them out for special occasions!

I've read that low bush cranberries are actually lingonberries. We used to go out every fall after frost and pick these tart, delicious little deep red berries. They grow close to the ground...I suppose that's why Alaskans call them low bush!
Here's the recipe - I don't know how they'll work if you don't have low bush cranberries, but feel free to try! I've adjusted it for where we live now. I'm going to try adjusting it to be more diabetic-friendly one of these days (almond flour and stevia), but for now I'm not messing with success.  If I get a chance I might even take a picture!


Ingredients

3⁄4 cup low bush cranberries 
3⁄4 cup powdered sugar

2 cups flour
3 tsp. baking powder (2-1/2 tsp. for high altitude)
1 tsp. salt
1⁄4 cup sugar (scant 1⁄4 cup for high altitude)
1 egg
1 cup milk (add 3 extra Tablespoons for high altitude) 

1/3 cup (scant) vegetable oil

Directions
  1. Preheat oven to 350° F. Prepare muffin pan with oil, spray release, or paper liners.
  2. Stir low bush cranberries and powdered sugar together in a small bowl.
  3. In a medium bowl, stir together flour, baking powder, salt, and sugar.
  4. In a separate bowl, whisk egg, milk, and vegetable oil together. Mix lightly into dry ingredients, being careful not to over-stir.
  5. Fill muffin cups about halfway. Bake in preheated oven 20 minutes or until golden on edges. 


B is for...Blackboard Technique and Birthday Balloons


Recently Richard Garay, Fun Stampers Journey President and Co-Founder, demonstrated the blackboard technique in this video.  It's a quick and easy technique, using black card stock, clear embossing ink, and pan pastels.  I remember using chalks for this technique a LONG time ago! :-) This is one of the three cards we'll be making at my April 22nd card class.

For this card I used the balloon paper from the Magical Journey Prints collection (PP-0038) and one of the wonderfully wonky cakes in the To You stamp set (SS-0083).  I've never used this stamp set without lots of coloring - so it's a bit of a change for me.  I think I like the simplicity.

Don't forget to check out the other A-Z blogs this month. You can find the list on this Facebook page.
I hope you'll come back tomorrow to see what I come up with for C - I have an idea, but that could certainly change between now and then!!

A is for...April Fools Day!

Good morning! I just discovered the "Blogging from A to Z" challenge via a friend of mine, Susan Berg. Check out her blog at SuseADoodle Do - she's an amazing artist and all-around nice lady whom I hope to meet in person some day.

I'm a BAD blogger, so decided the April challenge would be a way to at least try to increase my blogging. The "A" post was supposed to be Saturday - I'll see if I can catch up!

So, on April 1st my hubby and I were in the truck heading home to southern Colorado from a warm and pleasant couple of weeks in southern Arizona.  We hit the state line between New Mexico and Colorado on Raton Pass and THIS is what met us!  Luckily by the time we made it home, the snow was patchy and the fog had lifted, but the 1-mile stretch of dirt road to our place was pure, sticky mud! We had to hose off the trailer before we could start unloading.
 
We're back now to our beautiful blue skies and sunshine, so I figure this was just Mother Nature's April Fool's joke on us to welcome us back!!!