Thursday, December 28, 2017

Instant Pot Stackables

For Christmas I received a set of stackable pans for the Instant Pot. I immediately set out to find recipes for using them - I figured there would be piles of information out on the web. Well...basically I discovered that I need to search HARD! Since I'm probably going to lose the ideas I've found, I decided I'd better put them all in one place, thus this blog post! If anyone reads this and wants to add more ideas, they will be greatly appreciated!! Thanks so much to other IP users who have shared the following ideas.

Barbara Schlake shared these in the Facebook Group, Instant Pot Recipes Only:

Melissa Nesgoda shared several ideas in the same group:
  • Chicken on the bottom, with a bottled sauce or marinade, and Rice or Vegetables on top
  • Egg bake with cheese, vegetables, hashbrowns, etc. - not sure if that would take both pans
  • Reheat two leftovers at once
  • Lipton noodle side dishes - she mentions you should just use half the liquid it calls for
  • Noodles with alfredo sauce in one, pasta with spaghetti sauce in the other
In the Instant Pot Community Facebook Group, many people offered ideas:
  • Mary Simpson recommends salmon on the bottom and broccoli on the top (sounds healthy!)
  • Cindy Baldwin suggested Meatloaf and Mashed Potatoes
  • Lisa Kennard Martin said she makes two layers of egg bites (and warns that you may need to increase or even double the time needed)
Jeffrey Eisner at PressureLuck.com (he is so funny!) uses the stackables for:
I've joined quite a few Facebook Groups for the IP, and continue to find more. I plan to add to this list as I find new recipes or groups:
  • Pressure Luck
  • ThisOldGal.com Instant Pot Pressure Cooking and Pressure Cooker Recipes
  • Instant Pot Recipes and Pressure Cooker Recipes by Amy+Jacky
  • Pressure Cook Recipes by Amy+Jacky
  • Home Pressure Cooking (Instant Pot and Electric Pressure Cooker Recipes)
  • Instant Pot for Beginners
  • Instant Pot ® / InstaPot Recipes & Tips for Beginners
  • Instant Pot Cooking and Tips
I know this is just the tip of the iceberg, but maybe posting this will be of use to someone - I know it will help me keep track of these ideas!!!

Saturday, December 23, 2017

Background for Diecut


Now that everything's ready for Christmas, I've decided it's time to make up a couple dozen birthday cards. My mom always needs these, and it's also nice to have some made up for times when I forget a birthday till the last minute! I wanted a simple design to mass-produce, and figured this would also be a good way to use up some retired paper. But this particular die cut doesn't show up well against the patterned paper, and makes the card look way too busy. I'm not about to fussy cut that many backgrounds, so I pulled out the Scan 'n' Cut.

First I used the gifts die from the For You Die Set (DI-0252) to cut a bunch of the open images.

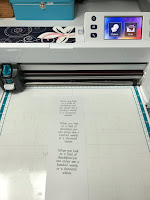
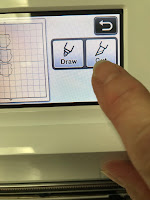
Then I used one of the negative shapes to create my Scan 'n' Cut pattern for the backgrounds. Select SCAN, then SCAN TO CUT DATA.

After scanning, I framed the shape I wanted and outlined it. Then I saved the pattern to my machine. You can also save to a USB thumb drive if desired. Now I have the shape, I can use it anytime I need it.
   

To cut the backgrounds, I selected PATTERN from the home screen, then SAVED DATA. I selected my machine rather than USB, since that's where I saved my background, then used the arrows to get to the file.
  
Once I had the shape on my workspace, I scanned in the piece of card stock that I wanted to cut. When I can see where my card stock is on my workspace, I slide the pattern into place and cut. (I'm only showing one shape for simplicity's sake, but to do a whole sheet of the same shape, just keep clicking ADD and selecting the shape as many times as needed. But you have to slide each shape off the previous one, as they just pile up in the same spot!!)
     
Now I just glue the die cut onto the SnC background piece for the finished image.
 

I thought about scanning in the actual die cut so it could be resized, etc.  But it would take longer to cut all those little pieces, of course, and I'm not sure it would cut cleanly. I scanned it, but haven't tried cutting it and don't think I will. It sure doesn't look very good on the screen at 200%.


Friday, December 15, 2017

December Technique Blog Hop

Welcome to A Year of Card Techniques Blog Hop where each month we feature a different card technique. We’ve assembled a team of card makers who range from new to advanced, so you’ll see a great variety of cards and ideas. This month we’re going to stamp our own background for a unique customized look.  Hopefully, we’ll inspire you to try one yourself.  If you would like to check out our past technique hops, you can do that here:
Our amazing sponsor this month is Claudia Henderson of Close to My Heart
Please take a moment to check out her store here.
And the awesome prize this month is:
We really appreciate feedback, so please leave a comment on each of the blogs in the hop today.  Since this is our last A Year Of Card Techniques hop and the holiday season is just around the corner, we are going to give you some extra time to hop!  The winner will be announced on Saturday, December 30, 2017 on A Piece of (my) Heart’s blog, so be sure to check her blog on Sunday. The winner will have until January 6, 2018 to claim their prize.  If you would like to be notified by email, please leave your email address in the comments.
You should have arrived here from Debbie's blog, Paws to Scrap.  If you're visiting here first, you might want to start at the beginning so you don't miss a thing and increase your chances of winning by commenting on each blog.
This was fun to make. I heat embossed the background with gold embossing powder, then rubbed gold pan pastel over the entire piece. (I think it's time to replace my gold embossing powder. It's kind of speckled!)


After doing this card for the hop, I decided to make a dozen more for my Christmas card stash this year. It's hard to tell in the photo, but it's very shiny - red glitter paper mats for the center panel and sentiment, and red glitter on all the berries.


I'm not sure what I'll do with this card - depending on what is stamped inside, I think it could become a birthday, thank you, sympathy, thinking of you or just hello.


Have you ever had an idea that looked GREAT in your mind, but when it was finished, not so much? This gray and yellow card is one of those. But gotta be real, right? So I'm including it even though I'm not terribly fond of it!! :-)


This is a color combination that I don't use too often, but I think I like it!


Now you’re off to visit with Amanda at My Thoughts and Scraps. Hope you had fun this year!
Here’s the full line-up in case you get lost:


Monday, December 4, 2017

New and Improved Sentiment Cutting with Scan n Cut

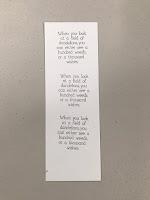
I just re-read my post from September where I explained how I cut out stamped sentiments with my Scan n Cut. I guess I must be learning SOMETHING, because I don't work nearly so hard now!!! It's time for an update. This probably isn't the way I'd cut this particular sentiment, but it was the first stamp that came to hand.

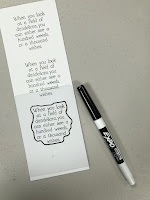
1. Stamp the sentiments you want to cut. With a fine-tip Sharpie or dry-erase marker, draw a cutting line on a piece of acetate lain over one of the images.
 

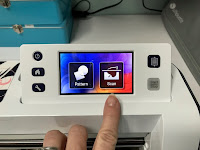
2. Scan the acetate sheet into the SnC (Scan to Cut Data) and save the shape, either to the machine's memory or your USB thumb drive.
      
3. Return to the home screen, and add the saved shape to your work space as many times as needed (Pattern).
    
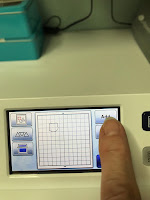
4. Scan the sheet of sentiments into the background (use the bottom icon on the left side of the screen) and move the shapes over the scanned images.
  
5. Cut!
  

Tuesday, November 21, 2017

Christmas Llamas

Here's an example of another card that uses masking:

Using Black Licorice ink pad, stamp llama head and neck on left side of Whip Cream panel. Mask left half and bottom of panel with post-it notes and stamp head on right side, slightly angled toward other image. Remove post-it notes.

Stamp hat and bow with Pomegranate Splash ink on scrap of Whip Cream card stock. Color with marker. Stamp scarf and holly leaves on scrap of Whip Cream card stock using Kiwi Slice ink. Cut images out and glue in place. Stamp sentiment on scrap of Pomegranate Splash card stock with Clear Embossing Ink. Sprinkle with White Embossing Powder and heat emboss. Allow to cool and cut around sentiment.


Fold Whip Cream card stock to form card base. Adhere Christmas Cheer Print strip to Pomegranate card stock, then adhere unit to front of card base. Adhere llama panel to Kiwi Slice mat, then adhere to front of card. Pop up sentiment with foam squares.

Inside: Stamp sentiment with Pomegranate ink. Adhere or stamp holly leaves near sentiment.