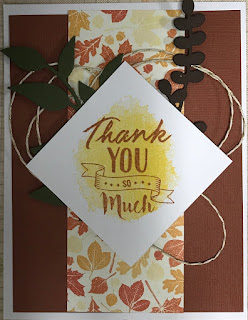
 Thanks Much Card

I started stamping and card making several years ago when my daughter took me to a home stamping party. When she no longer wanted them, I bought ALL her stamps AND all her friend's stamp pads, mailed them to Colorado where I'm living now, and started playing more seriously. I love card making, painting or drawing, sewing and all kinds of crafts.
Showing posts with label stamping. Show all posts
Showing posts with label stamping. Show all posts
Friday, September 15, 2017
Stamp Keeper
I just discovered a new site made for card makers and stampers! I can post a picture of a card I've created, along with step-by-step instructions and a list of the supplies I used. So if I ever get back into blogging regularly again, I'm going to definitely StampKeeper.com. It's also a great place if you want to just keep track of what supplies you have, and what you still want to get. So far I've posted a couple of test projects, but there are others who are posting their cards too, if you're looking for ideas. Here is one I've posted. The link will take you to the instruction page. Fun stuff!
Thanks Much Card
Thanks Much Card


Sunday, July 16, 2017
Saturday Stamping Fun
Christmas in July!
A friend came over yesterday and we stamped all day. What fun! Denise and I had signed up for RG Presents Journey Holidays, a seven-hour, live-streamed YouTube event featuring the new Fun Stampers Journey mini-catalog that will go live on August 1st. This was the first time either of us had done this, and we really enjoyed stamping together, doing the make 'n' takes along with Richard Garay, and seeing all the awesome project demonstrations.
I had muffins and fruit for breakfast, a salad and casserole all ready for lunch, and chocolate (of course!), but we didn't really eat much - we were too busy! They had some technical difficulties at one point in the morning, but after those were ironed out, the live feed went very smoothly. I had set up the large TV in the family room so we could watch in there, as well as the computer in my craft room, but we ended up in the craft room the whole time. After all, that's where all the "stuff" is!


These are the four make 'n' take cards (all supplies we needed, cut and ready to go) that came in the kit we received prior to the broadcast. We each also received two full stamp sets, two die sets, and an accessory pack. We did some stamping and die-cutting before the broadcast, and were really glad we did - Richard makes cards FAST!

During the technical difficulties, we played around with Denise's gel plate. These are some of the pieces we made, and we even had a chance to make a couple of cards, too. The gel plate is fun, and there sure are a lot of techniques you can use it for. I just might have to break down and get one!!


The next RG Presents is December 2nd, and will feature the upcoming spring and summer mini-catalog. Maybe we'll have a few more folks who want to come play! I know I'm looking forward to it already. And...now I'm inspired to start on my Christmas cards early this year!

Sunday, February 5, 2017
Bloom Box Club
Had a great class yesterday. I always love seeing how the ladies put their own individual touches on the cards, and enjoy the great socialization. I'm blessed with a really NICE bunch of people!! Our newest member, Shirley, mentioned how much she enjoyed everyone and how helpful they all are.

At our class I shared these cards I made using the Glass Blooms set and following the February 2016 Bloom Box samples.
If you're interested in getting together, making cards, and learning new techniques, Deb is starting a Bloom Box Club. You can sign up for a Bloom Box subscription on her website (www.funstampersjourney.com/DebMuniz), then join us every month when we get together to make the cards. The subscription is for 6 months, and then continues month by month unless you cancel it. The cost is $24.95 per month. With shipping and tax, mine came to $33.14.
Your Bloom Box will be delivered to your address automatically each month. It contains a full-sized red rubber stamp set and all the paper and embellishments needed to make 4 cards, along with a full-color booklet of instructions. We'll provide ink and any other necessary supplies at the club meeting.
Everyone who signs up for Bloom Box during the month of February will receive this set:
This is the month that finally tipped ME over the edge! Not sure if I love the colors or the image best. The actual stamp set will be available to anyone in May, but Bloom Box sets are exclusive for three months.

At our class I shared these cards I made using the Glass Blooms set and following the February 2016 Bloom Box samples.
If you're interested in getting together, making cards, and learning new techniques, Deb is starting a Bloom Box Club. You can sign up for a Bloom Box subscription on her website (www.funstampersjourney.com/DebMuniz), then join us every month when we get together to make the cards. The subscription is for 6 months, and then continues month by month unless you cancel it. The cost is $24.95 per month. With shipping and tax, mine came to $33.14.
Your Bloom Box will be delivered to your address automatically each month. It contains a full-sized red rubber stamp set and all the paper and embellishments needed to make 4 cards, along with a full-color booklet of instructions. We'll provide ink and any other necessary supplies at the club meeting.
Everyone who signs up for Bloom Box during the month of February will receive this set:

This is the month that finally tipped ME over the edge! Not sure if I love the colors or the image best. The actual stamp set will be available to anyone in May, but Bloom Box sets are exclusive for three months.
Tuesday, November 1, 2016
November Technique - Black Magic

Here's my November technique club sample, showcasing the Black Magic technique. This technique has been around for quite awhile. It's fun and a little different to stamp on black card stock instead of white, and see the colors pop. This can be quite stunning with a bold floral stamp, but I decided on something a bit more in keeping with the season.
The technique is simple: stamp a solid image with white ink on black card stock, and color the image when the ink is completely dry. Watercolor pencils are often used as the coloring medium, but I've used regular colored pencils here. After coloring, embellish a bit with a white gel pen, and it's ready to make into a card.
 I masked the pumpkin and the "hello" before stamping the leaf, to make it appear the leaf was behind the other images.
 Be sure the image is completely dry. You can use a heat tool to dry it and set the white ink.
 I colored the image with some Crayola colored pencils I picked up for 50¢ at a thrift store!
 And finally, I doodled a bit with a white gel pen to make the images stand out a little more.
Wednesday, October 19, 2016
Stamping on Die-Cut Shapes

Yesterday I needed to make 40 kits for this little candy topper for a Make-It project. Luckily, my friend Barbara was willing to loan me her Frosty Fun stamp and die, but the idea of stamping and die-cutting 40 snowmen was still a bit daunting, especially since I was having a pretty hard time lining up the die with the stamped image and keeping it in place while running it through my Journey Grand.
Then I remembered a YouTube video I had seen about using a stamp positioner to stamp AFTER cutting, and decided to try it with the home-made positioner my husband made for me.
First I cut the snowman shape out of a scrap piece of card stock and put it into one of the corners to act as a placement template for the blank die-cut pieces. The red showing through is a sheet of fun foam that cushions the metal back of the positioner, and the card stock is held in place by magnets.

Next, I placed the stamp right into the cut opening so it fit perfectly, and closed the acrylic door of the positioner so the stamp stuck to the door and would stamp in the same place every time the door was closed.

Here's my first try. Every now and then part of the image didn't stamp perfectly, so I just re-opened the door, made sure the die-cut shape was still in the template's opening, re-inked the stamp, and stamped again.

And here are a few of the finished snowmen. I was able to use my card stock much more efficiently by cutting blanks, and this was MUCH faster and easier than stamping, then placing and cutting, then doing it over and over again. This is a technique I'll definitely use again, especially with images that are a little difficult to line up in the cutting die.

Wednesday, October 5, 2016
October Technique - Bleach
 This month's Technique Club uses common household bleach. Remember to be very careful with bleach, not to spill it or get it on your skin, clothing, or other surfaces.
Before starting, I decided to experiment with different types of black ink for my base image. Some sources I looked at said to use Staz-On, others suggested heat embossing the image first, and still others didn't stipulate any particular ink. (Oh - one more thing! It's a GOOD IDEA to wear an apron!!!)

Memento Tuxedo Black was the least successful. The bleach lightened the black lines, and the image looked smeary. I think the VersaFine Onyx Black probably came out best, but Staz-on Black and FunStampersJourney Black Licorice Fusion worked well also.
Step 1: Stamp image on colored card stock. Different colors will yield different results. I test the bleach on a corner of the colors I'm thinking about using first. The dark blue and red I tried bleached to an ivory or yellowish color. I didn't try black, but I think that would give a rather striking effect.

Step 2: Using a small paint brush (not one of your GOOD ones!!) or a cotton swab, lightly paint the areas you wish to lighten. I found I have more control with a brush...I go out of the lines more with a swab. As the bleach dries, the color lightens. For lighter color, go over the area again after it dries.

Step 3: This may be as far as you want to go, but if you want to add a bit of color, I recommend wax-based colored pencils. I think the bleach might continue to work on markers or watercolor, but not sure. That's an experiment for another day! Here's my final sample, using a touch of green on the leaves:

Bleach can also be used to stamp with, using a "stamp pad" made of bleach-moistened folded paper towels on a saucer or other non-porous surface. Clean your stamps well with water after stamping with bleach.
Wednesday, August 17, 2016
August Club Technique - Watercolor Lift
Our August club technique is "Watercolor Lift." This simple technique seems to be all over the internet right now! Basically, large areas of color are protected by clear embossing, and then the rest of the color is "lifted" to create a softer look. I tend to use splotches of color, but I've seen beautiful cards done with horizontal blocks to create a smoother look. After you try the technique, make a card using your watercolor lift background. Here's mine:
 Share your creations on our group Facebook page at https://www.facebook.com/groups/315796892088019/> |
 |
| 1. Cover watercolor paper with random patches of color using water-based markers. |
 |
| 2. Spritz with water to blend edges. Let dry completely or use heat tool to speed drying. |
 |
| 3. Rub dry surface with Embossing Buddy or dryer sheet. Stamp image with clear embossing ink such as VersaMark. |
 |
| 4. Dust with clear embossing powder. Tap off excess. |
 |
| 5. Heat embossing powder until it melts. |
 |
| 6. Embossed areas will protect the color beneath the image. |
 |
| 7. Spritz with water again. |
 |
| 8. Soak up water with paper towels. Extra color will lift, leaving behind the darker color behind the embossed image. |
Saturday, July 9, 2016
July Swap
Occasionally I participate in a card swap with stampers all over the country. It's a great way to get new ideas. I made several copies of this card for the July swap, and can hardly wait to see what I get back! This one was fairly easy to mass produce. I love the way sponging with a bit of the yellow Pan Pastels makes the bulb light up. I also used silver Pan Pastels on the base of the bulb. I got BOTH of these stamp sets free when I went to the Fun Stampers Journey Convention...already saving up for next year! ;-)

Supplies:
Whip Cream Card Stock (CS-0040)
Lemon Drop Card Stock (CS-0018)
Retired Black & White Paper Pack
Sun Rays (DI-0108)
Rich Sorbet Pan Pastels (JM-0082)
Brush Silver Pan Pastels (JM-0097)
Black Licorice Ink (IP-0041)
Happy Sentiments (SS-0304)
Delightful Light (SS-0344)
Foam Squares (AD-0084, AD-0085)
Wednesday, June 29, 2016
Birthday Cards
I signed up for a Masculine Birthday swap at Convention, and had to come up with 25 cards. What was I thinking?!? I only had one non-retiring birthday stamp at the time, and nothing that was anymore masculine than this cake! So I ended up with these, figuring the colors were relatively non-feminine! Actually the same layout can be used for any birthday, depending on the printed paper and colors used. This particular paper pack is retiring tomorrow, but there are always MORE! I colored the cakes with Copics and/or water-based markers, just depending on what I could find to match the colors in the printed paper, and added a bit of Journey glaze to the candle flame and the berries/dots/whatever. Simple, fast, and fun - I suspect this design will show up in class one of these days, updated with fun new paper.


To You (SS-0083)
Going Places Paper Pack - Retired (PP-0009)


To You (SS-0083)
Going Places Paper Pack - Retired (PP-0009)
Wednesday, April 27, 2016
Mermaid Wishes
I seem to have trouble planning my cards for my monthly stamping group - I end up making MANY more cards than the three I end up with. And my craft room looks like a bomb exploded while I'm at it. I think this one will probably make the cut, just because of the sequins on her tail.


I have an over-abundance of patterned card stock from various sources in my stash, so I'm trying hard to use it up. This piece reminded me of water droplets, and I had those cute green flower-shaped sequins -- so a mermaid was born! It would be nice if she had a matching die, but she wasn't really too hard to fussy cut. The stamp set is one of the Bloom Benefits from page 5 of the current catalog (good until the end of June). Bloom Benefits are free sets you get with every $50 order. If you'd like to shop on my FSJ website, click HERE.
Wednesday, April 13, 2016
Thank You Tulips
It's been awhile since I've posted anything here. Life seems to just get in the way of my crafting sometimes. Today I spent 4 hours taking apart and DEEP cleaning the oven after opening it last night to billowing smoke! It needed to be done, even before I burned the pizza.... Anyway, I decided I deserved some stamping time this afternoon, so made up a few thank you cards for some awesome ladies in my stamping group.

I used a cute little FSJ stamp set that's on sale right now for only $5.57 (Tulips, AT-0143), along with a border stamp and a set of word stamps from my stash. I kind of hate to see this set retire, but I feel that way about most of my sets when they "go." My consolation is that they live on in my craft room!

I used a cute little FSJ stamp set that's on sale right now for only $5.57 (Tulips, AT-0143), along with a border stamp and a set of word stamps from my stash. I kind of hate to see this set retire, but I feel that way about most of my sets when they "go." My consolation is that they live on in my craft room!
Sunday, April 3, 2016
Hello, Lovely!
Good afternoon! The weather is beautiful today, so I spent some time outside, cleaning the flower beds. Of course we don't have daisies or bumblebees yet, but I thought this card, using the same sets as this card, might be appropriate. It doesn't show in the photo, but the bottom daisy is popped up with foam squares, and the inside of the card peeks out from behind the partially cut front cover.


Would you like to purchase the supplies to make this card? You can shop online at:
www.funstampersjourney.com/WILMAPAYNE
Stamps: SS-0192 Hello Lovely, AT-130 Tag Elements
Inks: IP-0041 Black Licorice
Card Stock: CS-0019 Lemon Grass, CS-0040 Whip Cream
Other: AD-0085 Journey Foam Squares, Water-based markers, clear Wink of Stella
Friday, March 25, 2016
Summer's Coming!
I just received this stamp set with my starter kit, and couldn't wait to try it. I randomly stamped the background with the three cute little bees, and colored with water-based markers. The FSJ Fusion ink is amazing! It doesn't smear with either water-based or alcohol-based markers, and it stamps really nice and dark.
I'm really happy with the FSJ colors, too. They're bright, clear, and happy! The stamps are deep cut and make clear, crisp images AND they stick to the blocks. Yes, I'm a happy stamper!

Stamps: SS-0192 Hello Lovely, AT-130 Tag Elements
Inks: IP-0041 Black Licorice
Card Stock: CS-0018 Lemon Drop, CS-0019 Lemon Grass, CS-0003 Black Licorice, CS-0040 Whip Cream
Other: DI-0042 Journey Ovals, AD-0084 and AD-0085 Journey Foam Squares, Water-based markers, clear Wink of Stella
Saturday, March 19, 2016
Lovin' my Cameo today
Anyway, I now have a LOT of dahlias to color. I've looked up pictures of dahlias for color ideas, and I'm going to use Copics...it will give me something to do while watching TV in the evenings! Stay tuned for more dahlia pictures.


Saturday, March 12, 2016
Spring Cards
My FSJ upline, Nanette Mueller, sent me this beautiful welcome card when I joined Fun Stampers Journey. It shows off several of the brilliant, intense fusion ink colors.

Nanette also made these adorable corner pockets, made with the Decorated Sleeve Pocket die (which is on sale during the month of March) for the ladies in my class, with cute little bunny sticky notes inside.

I'm getting SO ANXIOUS for my starter kit to be here!

Nanette also made these adorable corner pockets, made with the Decorated Sleeve Pocket die (which is on sale during the month of March) for the ladies in my class, with cute little bunny sticky notes inside.

I'm getting SO ANXIOUS for my starter kit to be here!
Saturday, March 5, 2016
I'm an FSJ Coach!!

I took an exciting step today, and signed up as a Fun Stampers Journey Coach. It's going to be fun getting to use new products and meet new people. Anyone interested in this new company, take a look at the catalog or order here: www.funstampersjourney.com/WILMAPAYNE
Subscribe to:
Posts (Atom)