 I have a new Scan n Cut 250 (an older model) that I'm just learning how to use. One of the things I want it for is to cut out stamped images that don't have matching dies. I think I finally figured it out today, after watching many YouTube videos on how to use a transparency! But I tend to prefer written tutorials, so thought I'd list the steps here in case I forget how the next time I need to do this. I store my acetate sheets with my stamp set to use again as needed.
- After stamping the sentiment, draw the cut line with a fine-line Sharpie on an acetate sheet.
- Affix the stamped sheet to the SnC mat. Use a bit of masking tape to align the acetate sheet over the sentiment to be cut.
- Feed the mat into the machine and touch Scan, then Direct Cut.
- Scan the image, then remove the acetate sheet.
- Now refine the cut line. Use the arrows to define the cut area, and preview to be sure to get the correct part of the scan.
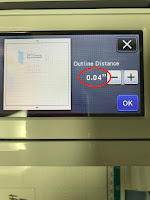
- Next, touch the offset button and set how far from the drawn line the cut should occur. (I like .04, but sometimes use .08)
- Cut, then put the acetate over the next image and repeat steps 3 through 6 for the next sentiment.


Love this Wilma. You have made my job SO much easier. Saving your post in my SNC file for later on when I have to do the same thing. Thanks for documenting the step by step. This is how I learn.
ReplyDeleteOooh thank you - just the way I need to see things. You are a star
ReplyDeleteJackie
Thank you. I just created a folder on my favorites so I can keep this and other SNC tutorials that are helpful
ReplyDeleteSo essentially you're creating a reusable acetate "die" - excellent, thanks for sharing :)
ReplyDeletethank you for doing this!
ReplyDeleteThanks!!!!
ReplyDeletehi from the top of Scotland, thank you so much, I love written notes to follow, so much easier. I look forward to hopefully more ideas/help from you. thanks Pauline
ReplyDeletegreat post! Thanks!
ReplyDeleteGracias!!! Desde Argentina te saludo.
ReplyDelete